E-Apps Quick Reference Guide for Filers
Electronic Applications ("E-Apps") enables the submission of documents associated with an application, notice or request ("filing") to the Board of Governors of the Federal Reserve System ("FRS").
Getting Access
To access E-Apps, you must obtain a digital certificate, which is a security measure that ensures only authenticated filers can access E-Apps. The certificate will reside on your computer and you will be the only person who can use it. You must be authorized by each institution for which you will submit filings. Information on how to obtain a certificate can be found at: https://www.federalreserve.gov/supervisionreg/afi/afi.htm
Questions about getting a certificate? Call the Customer Contact Center at (888) 333-7010, (Option 1).
Getting Started with E-Apps
Step 1: Access E-Apps through the FRS website at: https://www.federalreserve.gov/supervisionreg/afi/afi.htm
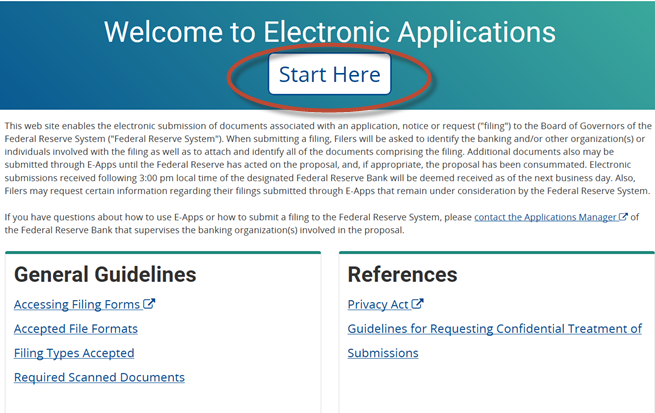
Upon a successful login to E-Apps, you will be directed to the welcome page. The links under General Guidelines and References contain information that will help you prepare and submit a filing, along with various legal information. To begin, click Start Here.
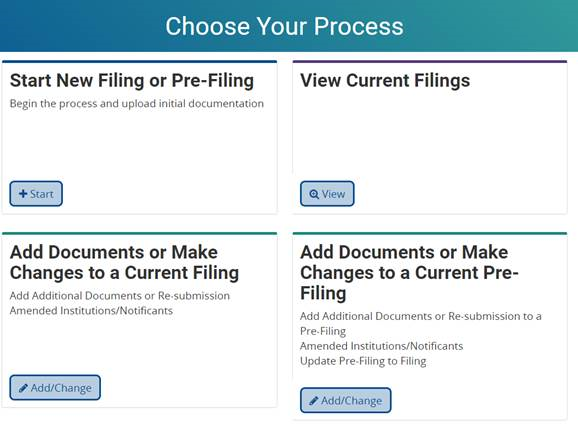
Step 2: At this stage, you can choose to start or make changes to a filing, or you can view current filings. Links at the bottom of the screen provide additional information and are repeated on every page. FAQ's and contact information is at the top right, under your name.
CAUTION: Filings must be completed and submitted in one session. For security reasons, E-Apps will time out after 10 minutes of inactivity. Have all of your documentation handy before beginning the filing process.
Please select the type of filing process you would like to initiate.
Start New Filing or Pre-Filing
- Begin the process and upload initial documentation
View Current Filings
Add Documents or Make Changes to a Current Filing
- Add Additional Documents or Re-submission
- Amended Institutions/Notificants
Add Documents or Make Changes to a Current Pre-Filing
- Add Additional Documents or Re-submission to a Pre-Filing
- Amended Institutions/Notificants
- Update Pre-Filing to Filing
NOTE: The submission date for all filings submitted after 3:00 PM of the designated Local FRB time zone will be the following business day.
Start New Filing or Pre-Filing
Step 1: Select the Start New Filing or Pre-Filing button.
NOTE: Draft filings are not accepted. However, advance Federal Register requests and biographical forms can be submitted prior to the submission of an initial filing.
Step 2: Select the institution(s) for the new filing by checking the select box.
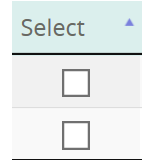
Cancel will delete any selections and return to home.
Continue will move to the next step.
Only institution(s) you are authorized to act on behalf of will show up in the institution list.
CAUTION: Do not use your browser buttons (Back, Refresh, Stop, etc.). Instead, use the buttons on the E-Apps pages (Previous, Cancel, or Continue).
Step 3: Confirm that the correct institution(s) has been selected. Click Continue.
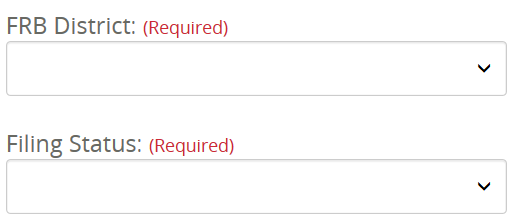
Step 4: Confirm that filer contact information on the Filing Profile page is correct. Select the District to which you wish to submit the filing, and select a Filing Status.
Click Continue.
 <
<Step 5: The document attachment page allows you to upload documents that are part of the filing and select metadata about them (confidentiality and document identifiers). The Browse button allows you to search your own computer for documents to attach.
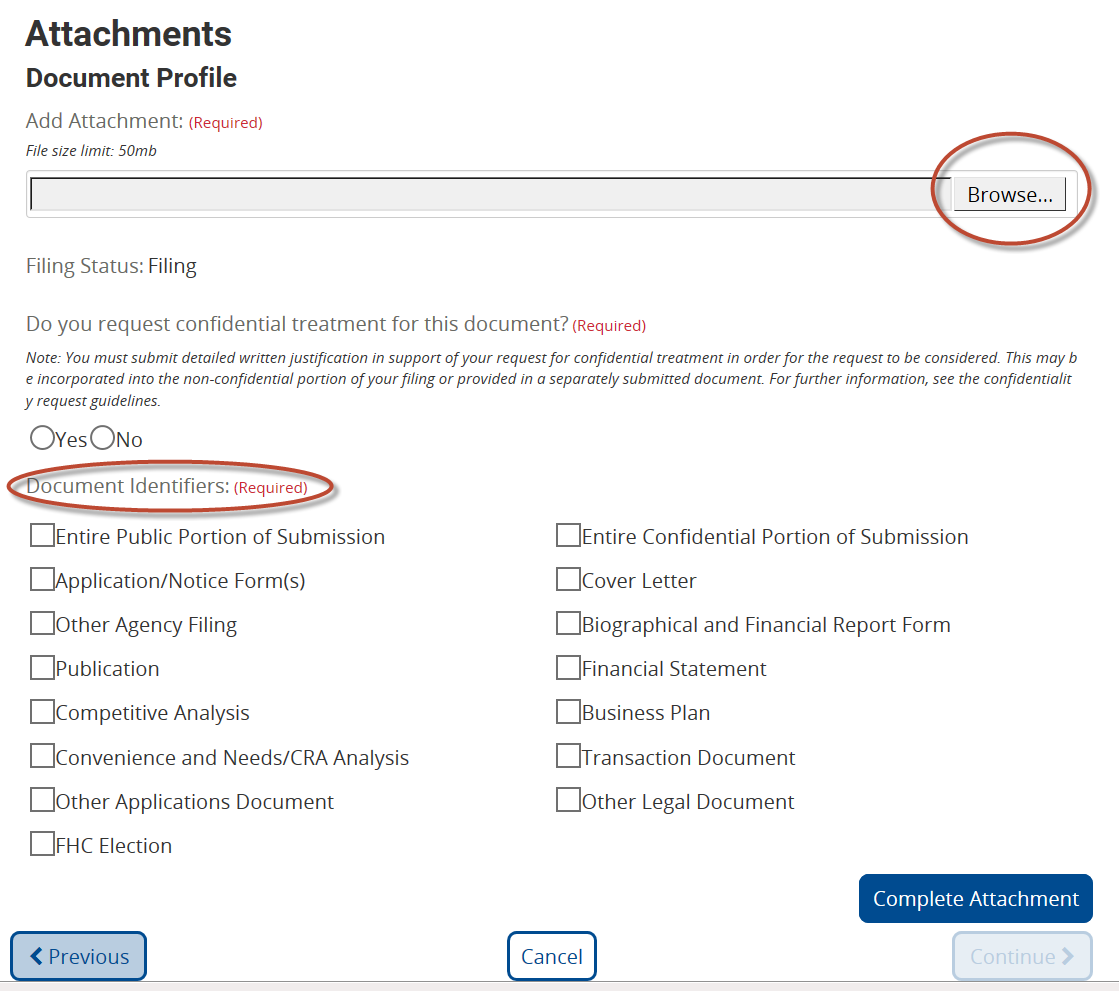
CAUTION: A Confidentiality Determination must be made and at least one Document Identifier must be selected, or you will get an error message.
After you click Complete Attachment, the document is added to the document table. You may attach as many documents as necessary by clicking the "Add an Attachment" button. Each document cannot be larger than 50MB. Improperly added documents can be removed. When finished, click Continue.
NOTE: Signature pages of cover forms, personal financial and biographical reports, and commitments must be provided in scanned documents.
Step 6: On the Legal Certification Page, you must check the box to accept the legal certification, and click Accept & Submit Filing to proceed.

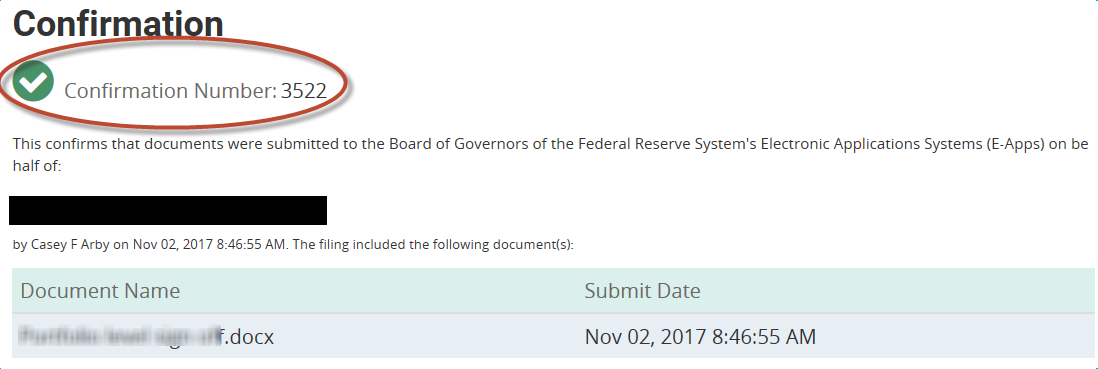
Step 7: Confirmation. You will receive a confirmation number for the filing just submitted, along with a list of the documents included and a copy of the legal certification. You should make a note of the confirmation number for future reference. You can now log out or begin another submission.
Add Documents or Make Changes to a Current Filing
Step 1: From the External Filer Home Page, select the Add Documents or Make Changes to a Current Filing button.
Step 2: Select the institution associated with the filing that will be modified and click Continue.
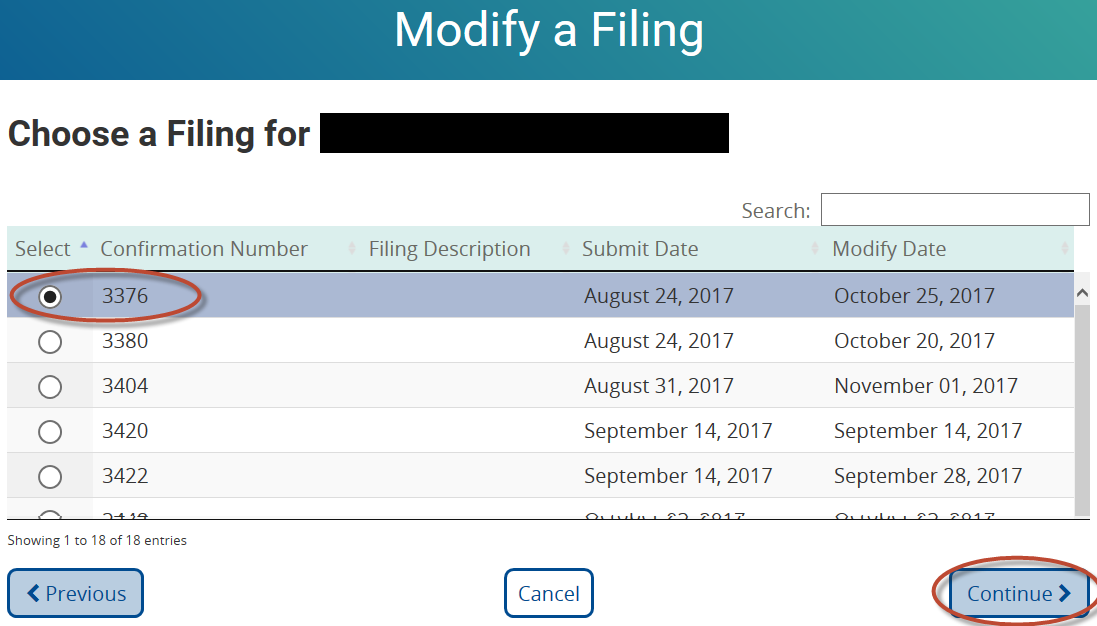
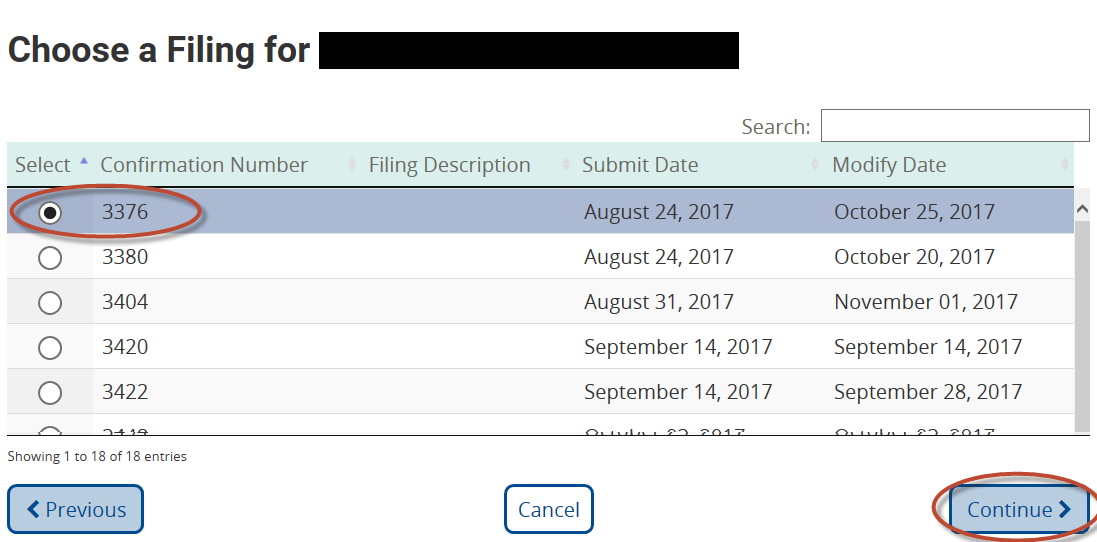
Step 3: Select the specific filing to be modified and click Continue.
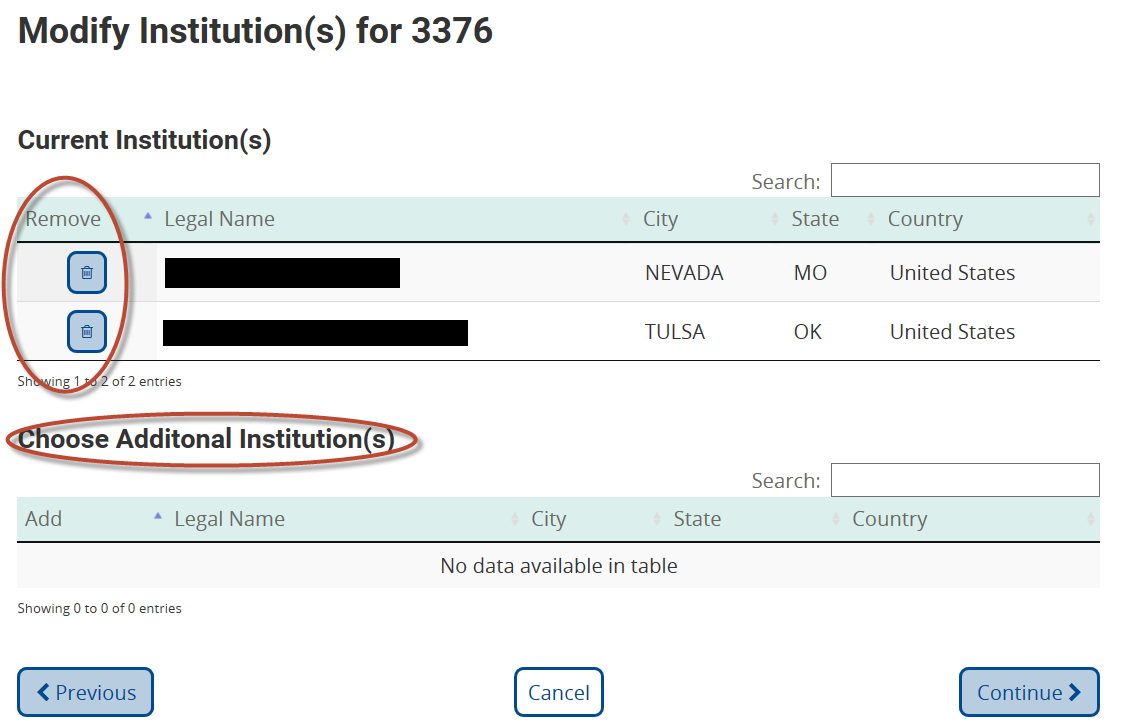
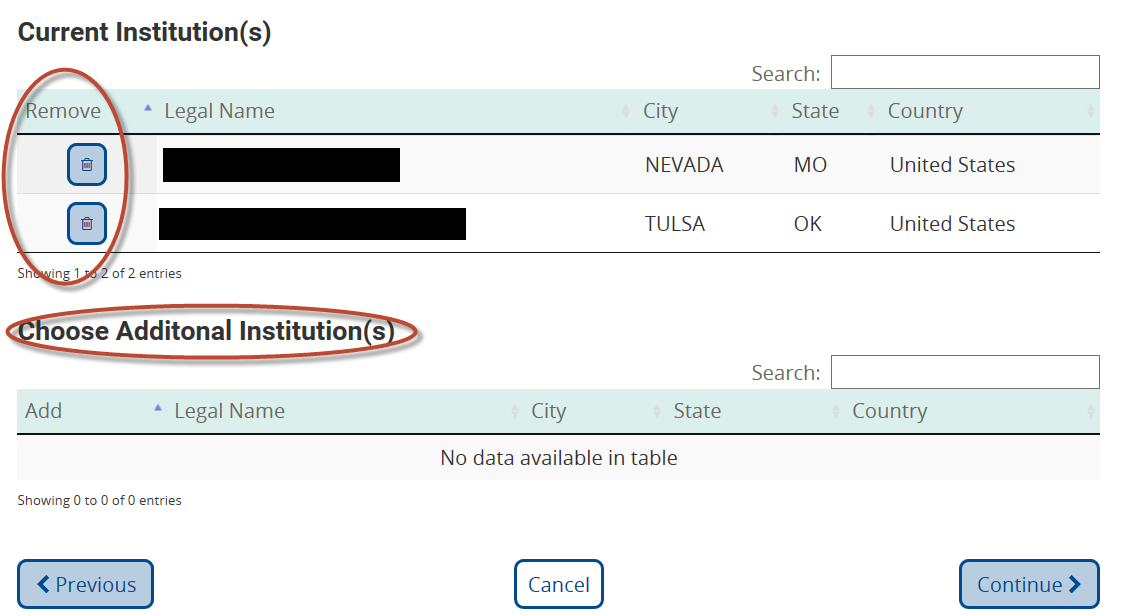
Step 4: Review the list of current institutions for this filing is correct. You can also add or delete institutions from the filing. If you have no additions or deletions, you can also simply select Continue from this page.
Step 5: The current attachments will be listed out with the option to add a new attachment under Document Profile. You must add at least one document to the filing. Select confidentiality, if this is a new document or re-submission, and the document identifiers. Click Complete Attachment and the document will show up in the table. Click Continue when finished.
Step 6: As with the initial filing process, when filing modification is completed, the Legal Certification page will appear. You must check the box to accept the legal certification, and click Accept & Submit Filing to proceed. The Confirmation of Submission page then appears and you will receive confirmation that the filing was modified, and a list of the new document(s) added.
Add Documents or Make Changes to a Current Pre-FIling
Step 1: From the External Filer Home Page, select the Add Documents or Make Changes to a Current Pre-Filing button.
Step 2: Select the institution associated with the Pre-Filing that will be modified and click Continue.
Step 3: Select the specific Pre-Filing to be modified and click Continue.
Step 4: You must indicate whether the status of the Pre-Filing should be changed to a Final Filing.
You may also add or remove institutions from the filing.
Step 5: At least one document must be added. If the filing status has been changed to "Final Filing," the filing status for the new document will be listed as Filing in the Document Table. Click Continue.
Step 6: Check the box to accept the Legal Certification, and click Accept & Submit Filing to proceed. The Confirmation of Submission page then appears, and you will receive confirmation that the Pre-Filing has been modified.
View Current Filings
Step 1: From the External Filer Home Page, select the View Current Filings button.
NOTE: You can only see summaries for institutions that have authorized you to act on their behalf.
Step 2: Select an institution associated with the filing you wish to view and click Continue.
Step 3: Select the specific filing you wish to view and click Continue.
Step 4: The summary will display the filing confirmation number, Federal Reserve District, filing status and document name(s) for the filing selected. You cannot view any of the documents attached to the filing.
Frequently Asked Questions
Who do I contact with questions regarding E-Apps?
E-Apps experts have been designated in each District to help you understand the system and how to use it. You may contact your local Reserve Bank Applications manager or analyst for more information.
Is technical support available for E-Apps?
Yes. If you encounter problems while using E-Apps, please contact your local E-Apps expert. Your local expert will work with you and technical staff to resolve the problem.
What file format should I use to submit my filing documents using E-Apps?
The preferred formats for submitting filing documents are Microsoft® Word (.doc), Excel® (.xls), or Adobe Acrobat® (.pdf) files. Please note that documents requiring a signature must be scanned. Individual documents cannot be larger than 50MB in size.
What if there is a virus in one of my files?
E-Apps scans all documents before they are uploaded. If a document is contaminated, it will not be accepted and you will get an error message.
What should I name my files?
You may name your files whatever you wish; however, we recommend using names that will be meaningful to the FRS staff that will be processing your filing.
Specifically, what documents must be scanned?
The signature pages of cover forms, personal financial and biographical reports, and commitments must be scanned. Other documents may be submitted in their native format (e.g., Microsoft Word, Microsoft Excel).
What if I make a mistake while submitting a filing?
Your local expert will notify you of any issues with a submitted filing, and you may be required to submit additional or revised information.
Can I submit filings 24 hours a day?
Yes, except Saturdays from 11:00 p.m. until Sundays at 1:00 p.m. CT. Filings received after 3:00 p.m. of the designated Federal Reserve Bank's local time zone will be deemed to be filed on the next business day.
How do I know that my filing was submitted?
You will receive both e-mail and on-screen confirmation that your filing has been submitted. Authorized officials at the institution you are filing on behalf of will also receive e-mail confirmation that the filing has been submitted.
How do I contact my local E-Apps expert?
Contact information can be found at: https://www.federalreserve.gov/supervisionreg/afi/eapps_contacts.htm
Appendix:
"E-Apps" and the E-Apps logo are registered trademarks of tile Federal Reserve Banks.
"Microsoft," "Internet Explorer", and "Excel" are registered trademarks of Microsoft Corporation.
"Adobe Acrobat" is a registered trademark of Adobe Systems Incorporated.